
Half Term Activity Ideas: Pumpkin Picking, Carving, and What to Do with the Leftovers
It’s that time of year again – pumpkin season! If your children are anything like mine, they’ll jump at the chance to pick the biggest, roundest pumpkin they can find (or the smallest!). Whether you’re heading to a local garden centre or grabbing one from the supermarket, pumpkin picking is such a fun way to kick off the autumn half term.

The Pumpkin Patch Adventure
If you haven’t tried it yet, we highly recommend getting the family to your nearest pumpkin growing garden centre or farm. There’s nothing more autumnal than heading out into a huge field packed with bright orange pumpkins, even if it’s muddy, chaotic, and your child is determined to carry a pumpkin three times their size. Don’t rush the fun – enjoy being outdoors together – let the children roam and choose their own “perfect” pumpkin – it makes the carving later that much more exciting! Pro tip: bring a pair of gardening gloves (trust me, pumpkins can get prickly!) and a blanket, tarp or bag to protect your car from the mud. Our favourite pumpkin patch also lets you use their wheelbarrows – very helpful when your child has picked something half the size of your car!

Carving Fun (and Chaos!)
Now, the fun really begins when you get those pumpkins home. Depending on your child’s age, this could be a cute family moment or a complete mess (ours is always the latter)! But that’s all part of the fun, right? I still remember the face my eldest pulled when he “gutted” his first pumpkin – as much as he hated the texture though, his younger brother was the stark opposite and getting right in there!
- Set the Stage: Lay down some newspaper, an old tablecloth or an old sheet – pumpkin guts can get everywhere! Give the children some spoons for scooping and let them go wild.
- Carving Time: If you’re feeling adventurous (or your children are old enough), you can try more creative designs. If not, the classic triangle eyes and jagged mouth never fail. I usually give the children a marker to draw their face on the pumpkin, then I do the cutting. As the children have got older we have started to let them handle some of the cutting themselves (supervised!)
- Pumpkin Safety: I always feel parents know best when they feel that their child is of a suitable age to handle knife, so I won’t put ages on here – every child (and parent!) is different! If your child is keen, get them to help by holding your hand on the handle, and make sure the other hand is well away from the “cutting zone”. For an alternative idea, why not use lots of different colour markers and colour the pumpkin in, or even use stickers?
What to Do with All That Leftover Pumpkin?
Once you’ve hollowed out the pumpkin and carved your masterpiece, you’ll be left with a whole lot of seeds and flesh. And instead of throwing it all in the bin, why not get a bit creative? We do this every year, and I think the boys love eating their pumpkins as much as they love carving them (they always remind me I have to bake everything for them afterwards!) Pro tip: If you’re really organised, get the children to dispose of the seeds and the excess flesh into different bowls when they’re gutting their pumpkins.

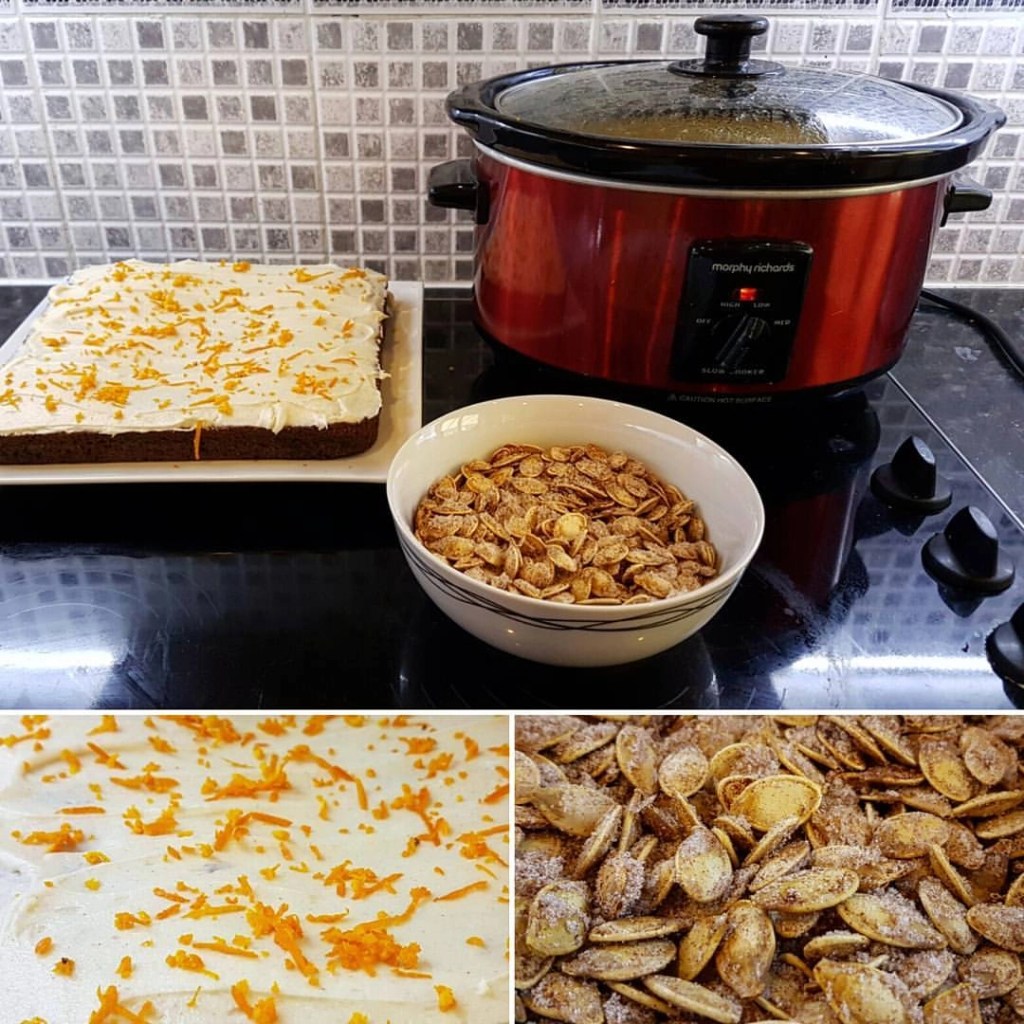
Roasted Pumpkin Seeds
If you’ve never roasted pumpkin seeds before, you’re missing out. They’re a super easy, healthy snack (and way better than the shop-bought ones!). We’ve tried different flavours over the years but the cinnamon ones are the winner in our family. By the way, roasted pumpkin seeds make a brilliant hiking snack!
- Step 1: Clean the seeds by rinsing them in a colander and removing the stringy bits of pumpkin flesh (most children love doing this bit, as there are some unique and unusual textures for them!).
- Step 2: Dry them with a towel and spread them out on a clean tea towel. For best results, leave to dry overnight (turning occasionally), or place in a low oven and turn occasionally. We tend to leave them by the fire overnight, turning occasionally to make sure every side and seed is dried evenly.
- Step 3: Once dried, prep the “coating”. This should make enough coating for two pumpkins worth of seeds. Melt 30g butter in a saucepan, then mix the seeds in. Mix 1 cup of castor sugar with 1tbsp of cinnamon in a separate bowl, and once combined, add the buttered seeds. Mix well so all seeds are coated.
- Step 4: Lay the seeds across baking trays, ensuring non are overlapping, then cook in an oven at around 160’C. Cook for approximately 40-90mins, turning every 10 minutes and ensuring no seeds overlap to allow even cooking. The cooking time can vary depending on your oven and how big and well dried the seeds were before cooking, but slowly slowly is there key here – they’re done when they’re nice and crunchy!
The result? Crispy, crunchy seeds that are perfect for nibbling on during a movie night. If sweet isn’t your thing, take a look at Google for some more fun flavours to try!
Slow Cooker Pumpkin Soup (Super Easy!)
You’ve got all that leftover pumpkin flesh, so why not make a cozy soup? It’s really simple, and even better if you’ve been outside in the chilly weather (like after a walk!).
Here’s a quick recipe:
- Step 1: Collect your ingredients: 1 onion (chopped), 1 tbsp garlic (crushed), 2 carrots (sliced), 1.5-2kg pumpkin flesh (or everything you can haul from one large pumpkin), 1 tsp Cumin, 1 tsp Paprika, 700ml chicken stock. I also love to throw in some rashers of bacon, cut into 1cm squares)
- Step 2: Throw it all into a slow cooker and leave it on low for 6-8 hours. (My kinda cooking!)
- Step 3: Use a stick blender to blend and you’re ready to enjoy! .
- Step 4: Optional – stir in some cream for a really indulgent soup!
Serve it with crusty bread and you’ve got yourself a warm, comforting autumn dinner. Bonus: children can help with the chopping and stirring, which makes them more likely to actually eat the soup.
Pumpkin Cake
If you’ve still got pumpkin left and want to indulge your sweet tooth (because who doesn’t?), why not give this pumpkin cake a go? If you’re a lover of carrot cake, you will want to try this – it doesn’t last long at all in our house!
- Ingredients: For cake: 300g self raising flour, 300g light muscovado sugar (I’ve used castor with success in the past!), 3 tsp mixed spice, 2 tsp bicarbonate of soda, 175g raisins or sultanas, 1/2 tsp salt, 4 eggs (beaten), 200g butter (melted), zest of 1 orange, 1tbsp orange juice, 500g pumpkin flesh (grated). For frosting: 200g pack cream cheese/soft cheese, 85g butter (softened), 100g icing sugar, zest of 1 orange and juice of half. It’s just as tasty with a simple dusting of icing sugar, or equally with an orange flavoured butter cream frosting!
- Tip: For best results, squeeze as much juice as you can out of the pumpkin flesh before using and weighing. We’ve also successfully used this recipe with carrots and butternut squash!
- Step 1: Heat oven to 180C/fan 160C/gas 4. Butter and line a 30 x 20cm baking or small roasting tin with baking parchment. Put the flour, sugar, spice, bicarbonate of soda, sultanas and salt into a large bowl and stir to combine.
- Step 2: Beat the eggs into the melted butter, stir in the orange zest and juice, then mix with the dry ingredients till combined. Stir in the pumpkin. Pour the batter into the tin and bake for 30 minutes, or until golden and springy to the touch.
- Step 3: To make the frosting, beat together the cheese, butter, icing sugar, orange zest and 1 tsp of the juice till smooth and creamy, then set aside in the fridge. When the cake is done, cool for 5 mins then turn it onto a cooling rack. Prick it all over with a skewer and drizzle with the rest of the orange juice while still warm. Leave to cool completely.
- Step 4: If you like, trim the edges of the cake. Give the frosting a quick beat to loosen, then, using a palette knife, spread over the top of the cake in peaks and swirls. If you’re making the cake ahead, keep it in the fridge then take out as many pieces as you want 30 mins or so before serving. Will keep, covered, for up to 3 days in the fridge.
Don’t Forget to Compost!
Lastly, if you’ve got any bits of pumpkin left over, don’t toss them in the rubbish. Pumpkins are great for composting. Plus, if you leave them out in the garden, the wildlife will thank you. Squirrels, birds, and even foxes love a good pumpkin snack (just make sure it’s not moldy). If you don’t roast the seeds, these can be left out for birds (wash them first and maybe crush them so the smaller birds can enjoy them too). We always pop our used pumpkins into the hedgerow – they never last long, but it certainly adds to the spooky festivities when you see a slowly decomposing pumpkin hidden in a hedge staring back at you every time you look out your window…
So there you have it! Pumpkin picking, carving, and all the ways you can use up those leftovers. It’s a fantastic way to get the family involved in the autumn fun and make the most of the season (and the half term holiday). Plus, who doesn’t love a good pumpkin-flavoured treat at the end of it all? Happy Hallowe’en, and may your carvings be spooky and your snacks delicious!
For more Free or Cheap Outdoor Activity Ideas for Children please take a look here!
Discover more from Treks, Trails & Travel
Subscribe to get the latest posts sent to your email.

Love the pumpkin seeds idea here, definitely a good snack
LikeLiked by 1 person
They’re so delicious, never last long though 😂
LikeLiked by 1 person
From Conkers to Pumpkins, sublime to ridiculous! I hated carving the things and never found a way of eating them afterwards that wasn’t bland. Unlike conkers a kids activity I’m glad to see the back of – what a grumpy old git I am! 🤣
LikeLiked by 1 person
😂 I love the honesty! Well if you’re a cake person, and we ever meet, I will have to make you some of the cake – it’s DELICIOUS! (My boys wouldn’t eat it if it was bland – children are brutally honest haha 😉 )
LikeLike